


Jun 23, 2026
Intro to STIG Tools
Effective hardening requires balancing security, operational needs, and long term maintainability.
![]() Tristram
Tristram
In this Learning Module, we’ll cover the following Learning Units:
- Understanding STIGs
- STIG Tools
One of the many areas blue teamers will eventually become involved in is system hardening. Unfortunately, in many environments, hardening efforts begin reactively rather than proactively. Yes, that sounds ridiculous, but it happens more than you realize. This could come from an auditor flagging several compliance issues during an assessment or even from a cyber insurance questionnaire asking whether recognized security baselines are being followed. If you haven’t gone through a cyber security insurance questionnaire before, for everything you’re not doing, you will either increase your premiums or you won’t get coverage at all.
That reactive mindset creates one of the most common mistakes in defensive security which is treating hardening as the finish line rather than the foundation. Security hardening is not a silver bullet. Hardening is simply one layer within a larger defense in depth strategy. Its purpose is to reduce unnecessary exposure, eliminate insecure defaults, and establish stronger baseline configurations for defenders to build upon.
Because of this, many auditors expect organizations to use established hardening frameworks as a starting point rather than attempting to build security standards entirely from scratch. I mean, it would be great if everyone adopted Tristram’s Hardening Framework as a starting point, but alas, an auditor isn’t going to know what that means.
Some of the most common hardening frameworks used throughout the industry include:
- Center for Internet Security Benchmarks (CIS)
- National Institute of Standards and Technology (NIST) guidance
- Security Technical Implementation Guides (STIG)
While each framework has its own strengths, operational considerations, and target environments, for this guide, we will focus specifically on STIGs and the tooling used to manage, validate, and document compliance efforts.
Security Technical Implementation Guides, referred to as STIGs, are security configuration standards developed by the Defense Information Systems Agency (DISA) using best practices from NIST.
At their core, STIGs exist to help organizations reduce risk through stronger and more consistent system configurations. Rather than leaving security decisions entirely up to individual
administrators, STIGs provide documented guidance based on accepted security practices, operational experience, and real world threat considerations.
The primary goal of STIGs is not to create perfectly secure systems. No hardening framework can fully eliminate risk. Instead, the goal is to reduce unnecessary exposure, strengthen default configurations, and make systems more resilient against common attack paths and misconfigurations.
Each STIG contains a collection of security requirements for a specific technology or platform. These requirements are broken down into individual findings that explain:
● What configuration should exist
● Why the setting matters
● How compliance is validated
As administrators work through a STIG, they are reviewing the security posture of a system one control at a time and validating whether that system aligns with an established hardening baseline.
STIG guidance commonly covers areas such as:
● Registry configurations
● Account policies
● Audit and logging settings
● Network hardening controls
● Service restrictions
● Authentication requirements
● Monitoring configurations
For blue teams, STIGs provide consistency across systems while also creating measurable baselines that can be validated through compliance scanning and reporting.
Each STIG finding is assigned a severity category to help administrators prioritize remediation efforts and focus on the most impactful risks first.
● CAT I findings represent critical security issues that pose severe risk to the confidentiality, integrity, or availability of a system. These findings typically receive the highest remediation priority.
● CAT II findings represent significant security weaknesses that increase organizational risk if left unresolved. While not always immediately critical, they still require timely remediation.
● CAT III findings are lower severity issues that improve overall security posture but generally present less immediate operational risk compared to CAT I and CAT II findings.
One of the most important lessons administrators must learn is how to prioritize remediation efforts effectively. Not every finding carries the same level of risk, and severity categories exist to help organizations focus their time and resources where they matter most.
That said, one of the biggest mistakes you can make is dismissing a CAT III finding as something that never needs to be addressed. Low severity findings may appear insignificant on their own, but attackers and penetration testers routinely chain multiple low priority weaknesses together to build a successful attack path. A single CAT III issue may not compromise a system by itself, but several overlooked weaknesses combined can create serious security exposure.
The CAT system should be treated as a prioritization framework, not a justification for ignoring findings. Organizations should generally focus remediation efforts on CAT I findings first, followed by CAT II findings, and then work toward resolving remaining CAT III findings as part of ongoing hardening and maintenance efforts.
Before working with STIG tools, it is important to understand the general workflow most organizations follow during hardening and compliance efforts.
It is also important to recognize that fully deploying STIG configurations across an enterprise environment is often a major discussion in itself. Large scale STIG implementation typically involves testing, operational validation, change management, phased deployment planning, and coordination between security and systems administration teams. This section focuses primarily on the compliance assessment and validation side of the process rather than enterprise deployment strategy.
A typical STIG compliance workflow looks something like this:
1. Select the appropriate STIG baseline
2. Scan the target system for compliance issues
3. Review failed findings
4. Validate whether findings are operationally relevant
5. Remediate failed configurations
6. Document exceptions and justifications
7. Rescan the system to validate remediation
8. Maintain compliance documentation for reporting and auditing
This workflow is where STIG tools become essential. These tools help administrators automate compliance scanning, review findings, track remediation progress, document exceptions, and maintain audit ready compliance records over time.
Several tools are commonly used to help administrators validate STIG configurations, document findings, and manage remediation efforts. While some solutions are tied to commercial products, the most widely used tools are STIG Viewer and SCAP Compliance Checker which are available at no cost.
In this section, we will walk you through how to install and use both of these tools to understand how these tools fit together within the overall hardening and compliance validation workflow.
SCAP Compliance Checker is used to automate portions of the compliance validation process. Instead of manually reviewing every security setting, administrators can run automated scans against systems using SCAP benchmark content to quickly identify failed or missing configurations. That benchmark content can be STIG baselines.
It is important to understand that automated scans do not validate every security requirement. Some findings still require manual review and operational verification by an administrator. You will see some of that shortly.
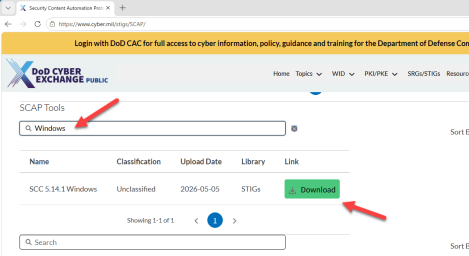
With that being said, let’s move on to installing SCAP Compliance Checker. Start by browsing to the SCAP and scroll down to the SCAP Tools section. In the search field, type Windows, then click the green download button to download the installer package.
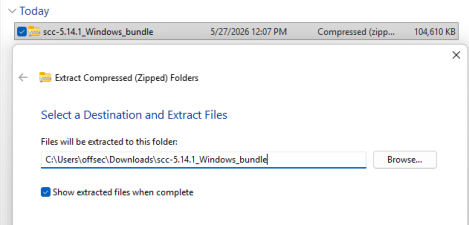
This will download a compressed ZIP archive that must first be extracted. Right click the ZIP file, select “Extract All”, and extract the contents to your “Downloads” directory.
Once extraction is complete, you will see the installation directory containing the setup files. To begin the installation, right click “SCC_5.14.1_Windows_Setup.exe” and select “Run as administrator”.
:::warning You may receive a Microsoft Defender SmartScreen popup during this install. You can bypass by clicking “More Info” and selecting “Run anyway”:::
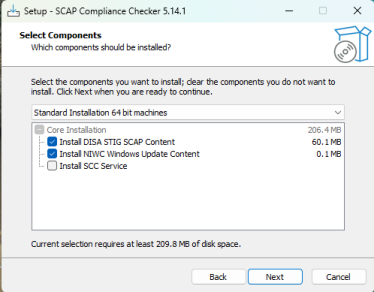
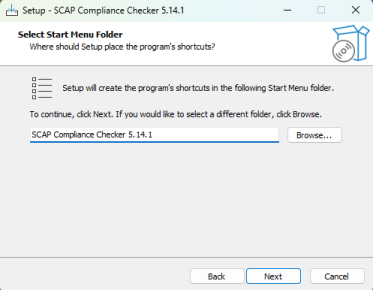
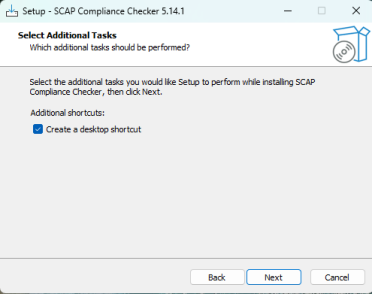
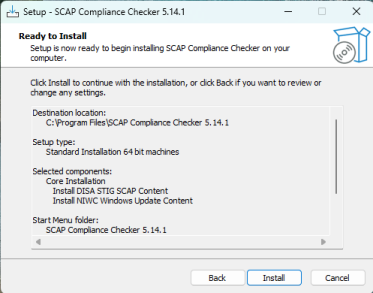
The installation process is very straightforward, but to proceed simply follow the below step:
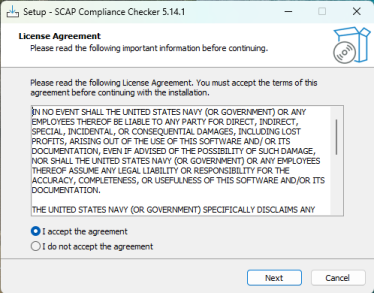
1. Review and accept the license agreement
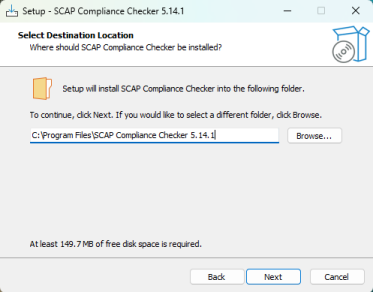
2. Keep the default installation directory
3. Leave the component selected
4. Keep the default Start Menu folder
5. Select the option to create a desktop shortcut
6. Once you review the installation summary, click “Install” to begin the installation process.
After installation completes successfully, you should see both the completion screen and a desktop shortcut for SCAP Compliance Checker.
Let’s make sure the application has indeed installed properly by launching the application.
:::warning This application has a tendency to take anywhere from 15 to 30 seconds to initialize on some machines. :::
Great, everything appears to have been installed properly, and we now have the tooling necessary to begin validating systems against STIG baselines.
Now that SCAP Compliance Checker is installed, the next step is establishing a baseline so we understand the current security posture of the system. Baseline assessments are critical because they provide measurable insight into where a system currently stands compared to the selected hardening standard.
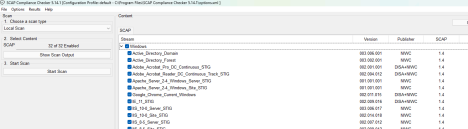
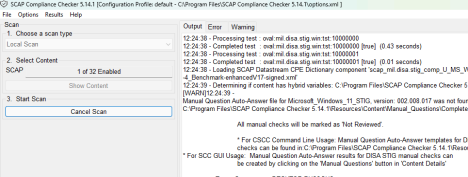
Launch the SCAP tool and take a look at the “Content” frame. For this example, we will focus specifically on the Windows 11 STIG baseline. While SCC supports scanning against multiple baselines simultaneously, limiting the scope initially makes it easier to interpret results and understand the workflow.
Within the Content frame, uncheck the “Windows” option and check off “Microsoft_Windows_11_STIG”.

Next, verify that the scan type in the upper left corner is set to “Local Scan”, then click “Start Scan” at the bottom of the “Scan” frame..

During the first scan, SCC may display a popup referencing manual checks or questions. These are findings that cannot be fully validated through automation and require human verification.
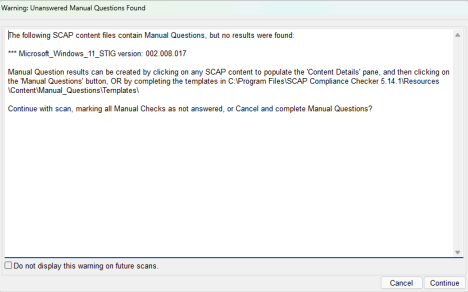
This is completely normal and highlights an important lesson when working with compliance tooling and that is that automated validation helps lessen some of the administrative burden of compliance validation, but it does not replace manual administrator oversight.
Once the scan begins, you will see progress information populate in the “Log” frame at the bottom of the application.
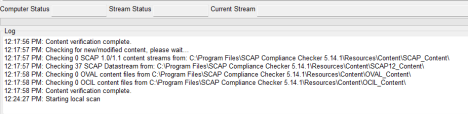
Additional Output, Error, and Warning tabs provide real time information about the scan operation itself. You’ll review this shortly after the scan completes.
Depending on available system resources and installed security products such as antivirus or EDR tools, scans may take several minutes to complete. Security software can occasionally interfere with portions of the scanning process, so reviewing warnings and errors should become part of your normal workflow.
After a few minutes, our scan has completed. Under the Output tab, you can see that we have 0 errors but 1 warning.

Warnings commonly indicate the presence of manual review items rather than actual scan failures. To verify this, click on the “Warning” tab on the top of the top of the application.
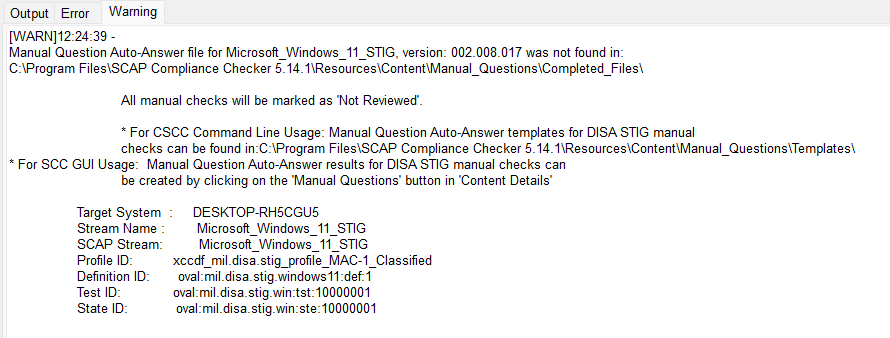
After reviewing this, we’ll find the information we were already made privy to in regards to there being manual checks involved.
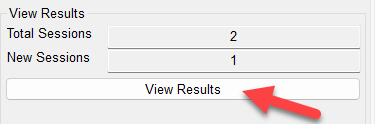
To review compliance results, click “View Results” in the left navigation pane.
This opens the session history window, which tracks historical scans and can help demonstrate compliance progress over time. Maintaining scan history is valuable not only for internal tracking, but also for audit preparation and leadership reporting.

Let’s double click “All Settings” to provide a complete view of the system’s compliance posture. Out of the box, most operating systems will not be fully compliant with the Windows 11 STIG baseline.
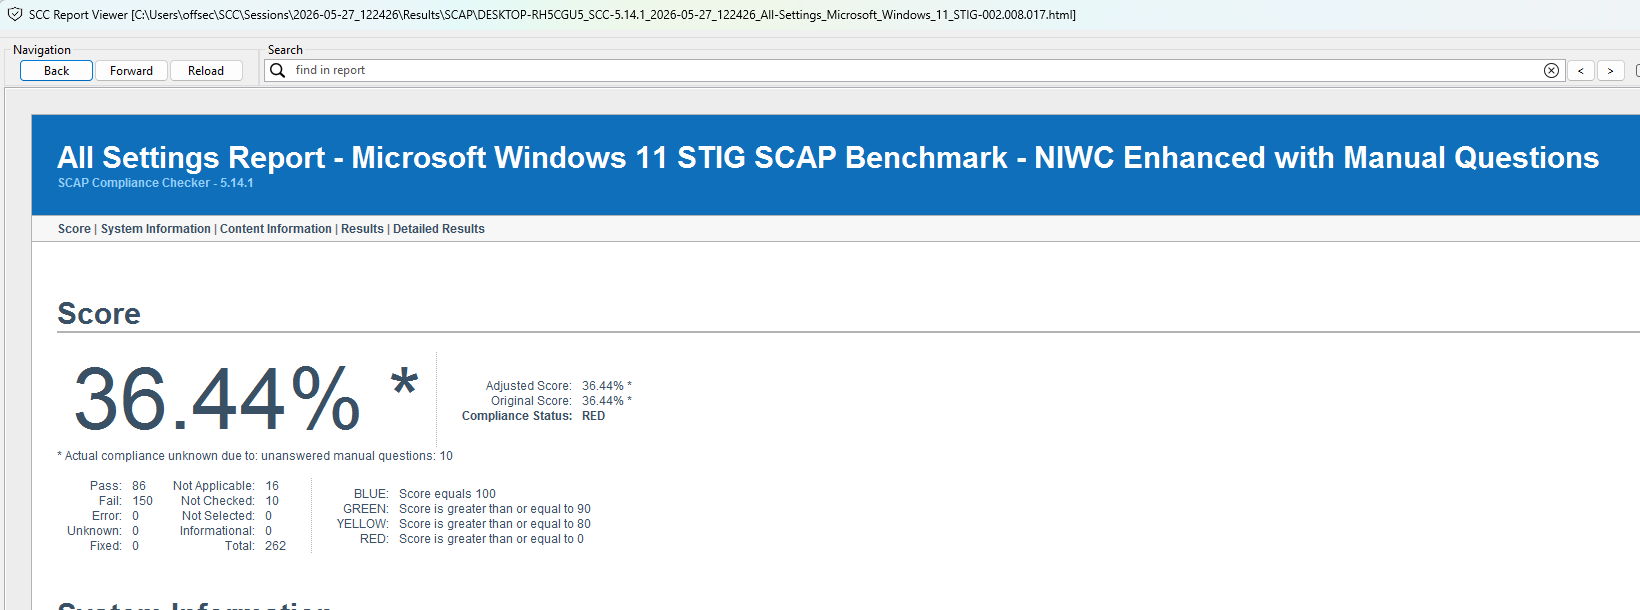
The compliance score is relatively straightforward:
- Lower scores indicate greater deviation from the baseline
- Higher scores indicate stronger alignment with the selected STIG
If you scroll down the page, you’ll start seeing the findings prioritized from CAT I down to CAT III.
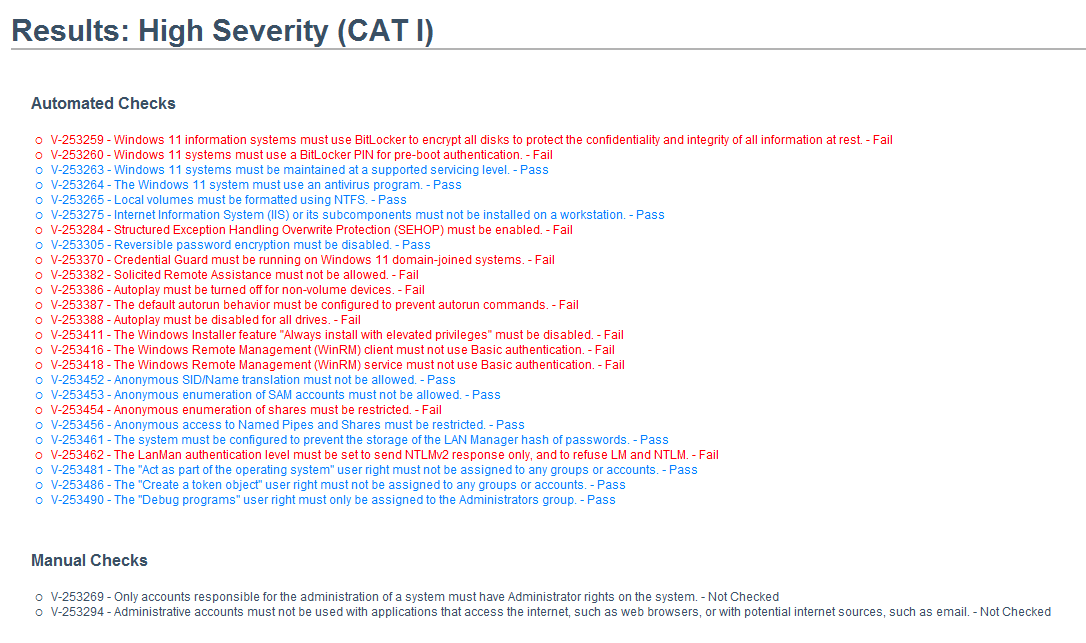
Color coding within the report helps quickly identify finding status:
- Red indicates failed findings
- Blue indicates passed findings
- Gray indicates findings requiring manual review or findings that are not applicable
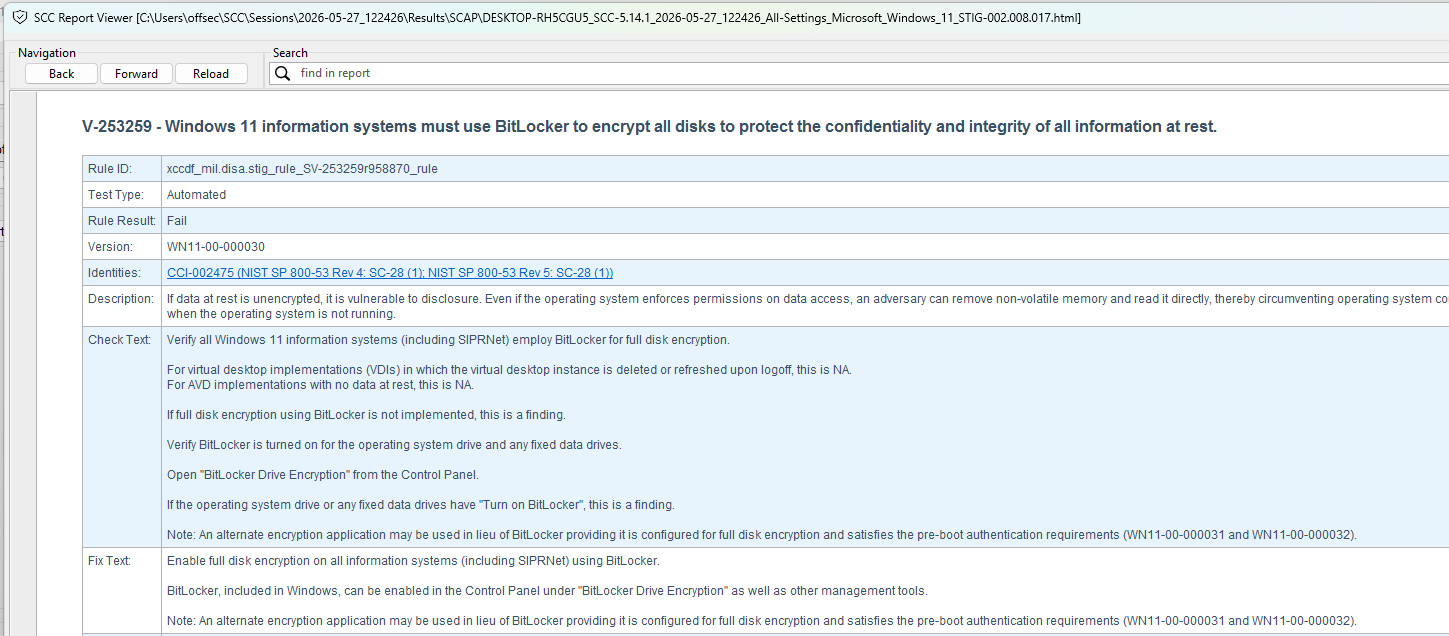
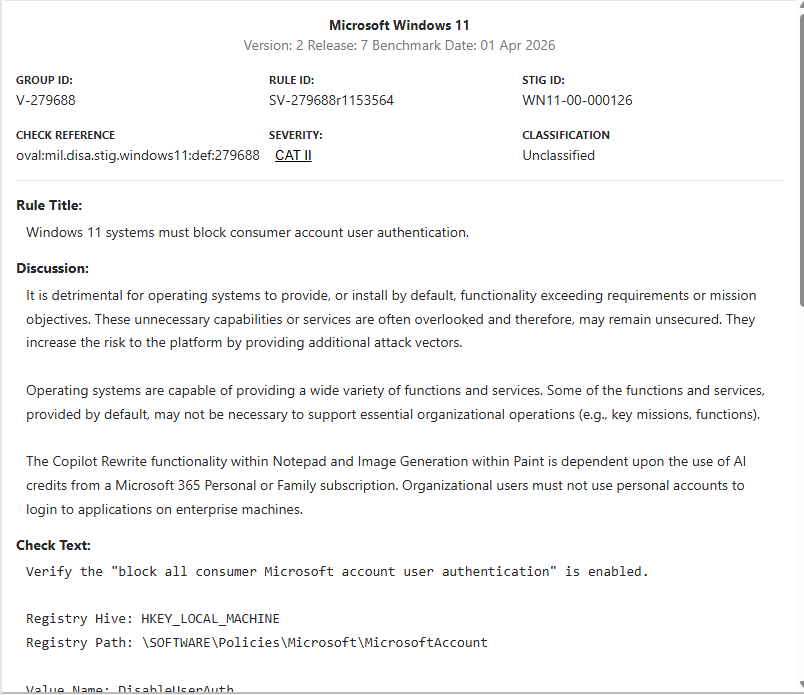
Each finding is a clickable link that will bring you to a separate section that displays detailed information including:
- Vulnerability description
- Severity level
- NIST references
- Recommended remediation guidance
- Validation criteria
Previously, I had mentioned that some rules are actually questions.This is because STIG rules are not only static configuration settings but pertain to workflows or manual checks that cannot necessarily be automated. You will find these in your scan reports as “Manual Checks”.

One important lesson when working with STIGs is understanding operational relevance. Some findings are highly environment specific. For example, there is a STIG setting related to DoD NTP servers that may be entirely appropriate in a military environment but irrelevant in a commercial organization.
In a nutshell, that is the majority of your workflow within the SCAP tool. However, you’ll quickly notice that leveraging this tool alone to maintain and track compliance to a given STIG baseline is going to be very difficult. That, my friends, is where STIG Viewer steps into the conversation.
STIG Viewer is used to review and manage STIG checklist files generated through the STIG compliance process. While tools such as SCAP Compliance Checker are responsible for scanning systems and identifying compliance findings, STIG Viewer is used to organize, document, and track those findings over time.
Administrators rely on STIG Viewer to review scan results, document remediation efforts, record operational exceptions, update finding statuses, and maintain audit ready compliance documentation throughout the hardening lifecycle.
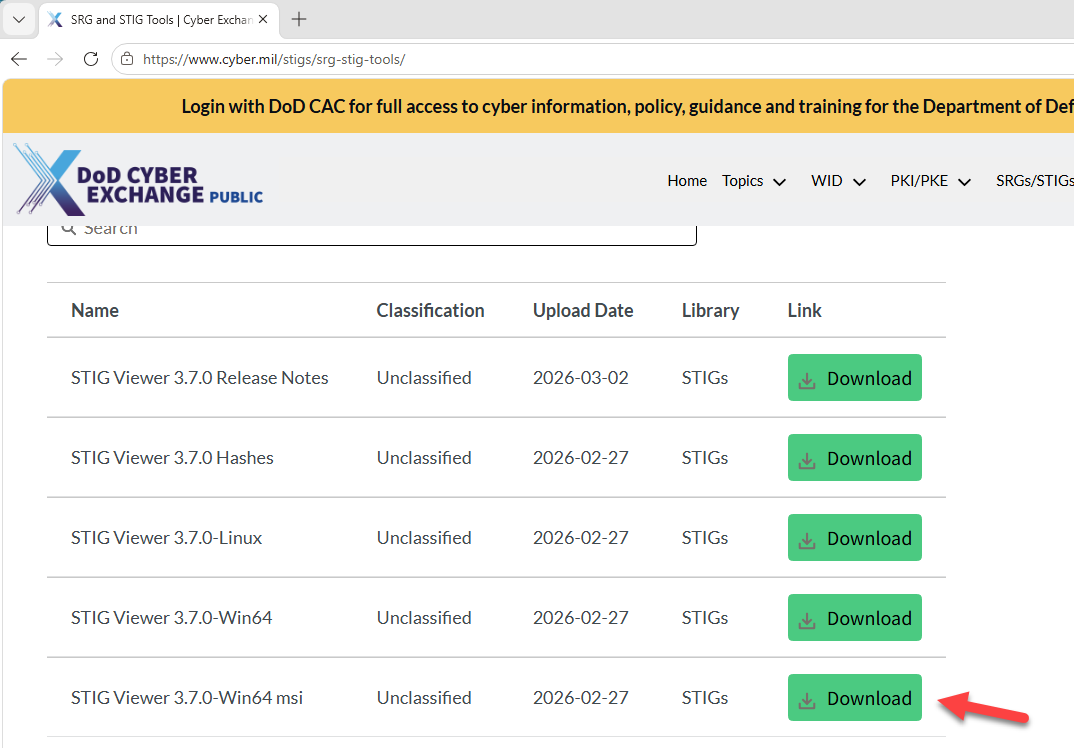
To install STIG Viewer, browse to the DISA STIG Tools page at STIG and download the latest STIG Viewer package.
This will download a compressed ZIP archive that must first be extracted. Right click the ZIP file, select “Extract All”, and extract the contents to your “Downloads” directory.
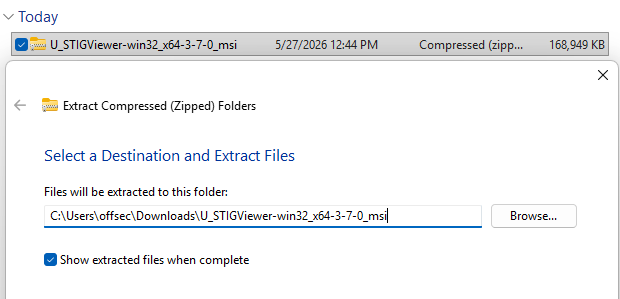
Once extraction is complete, you will see the installation directory containing the setup files. To begin the installation, double click “STIG Viewer 3.msi”. The installation itself does not require any custom parameters so it’s very straightforward.
After the installation completes successfully, you should see a desktop shortcut for “STIG Viewer 3”.
Let’s make sure the application has indeed installed properly by launching the application.
Previously, we completed a compliance scan using SCAP Compliance Checker to identify systems that were not aligned with the selected STIG baseline. However, identifying findings is only one part of the compliance process. Administrators also need a way to document remediation efforts, track compliance decisions, and manage exceptions over time. This is where STIG Viewer becomes essential.
One of the files generated during an SCAP scan is a checklist file, which contains the results of the compliance assessment. STIG Viewer allows administrators to open these checklist files, review findings in a more manageable format, update finding statuses, add remediation notes, document operational justifications, and maintain audit ready compliance records throughout the hardening lifecycle.
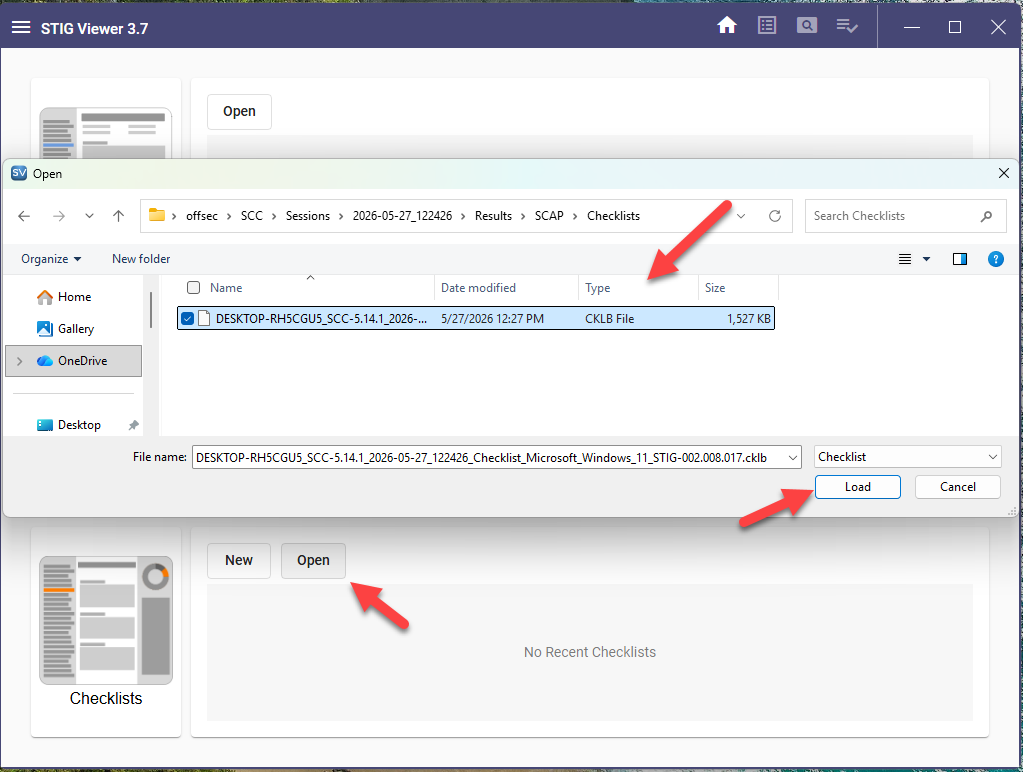
Let’s see this in practice. Go ahead and open STIG Viewer and select “Open” under the Checklists section. By default, SCC stores scan session data within the user profile under the SCC directory. In this example, the checklist file is located within `C:\Users\offsec\SCC\Sessions\<DATETIMESTAMP>\Results\SCAP\Checklists`. Navigate to the `.cklb` file generated during the scan and open it within STIG Viewer.
Once loaded, the checklist presents findings in a far more manageable and administrator friendly format.
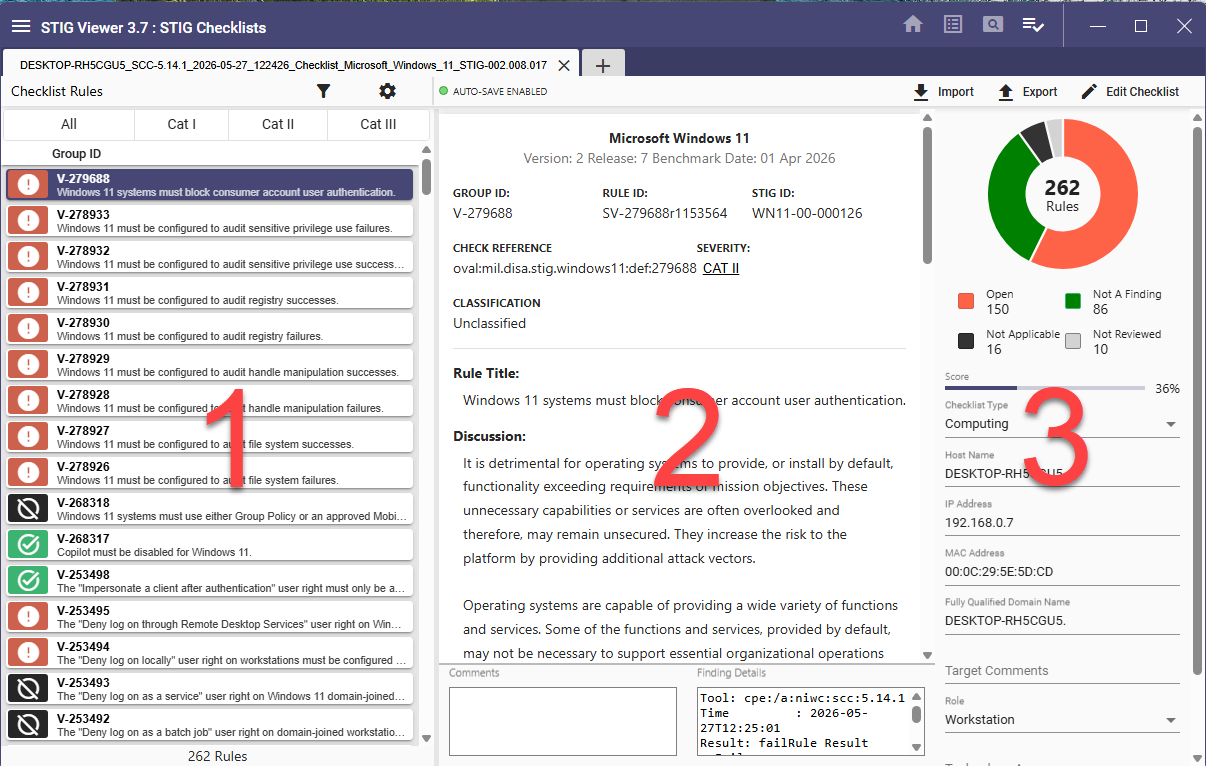
Let’s walk through this interface briefly. On the left pane, labeled as “1”, you’ll find the individual findings and their statuses. The center pane, labeled as “2”, you will find detailed remediation guidance and finding information. Finally, on the right pane, labeled as “3”, you’ll see your compliance scoring.
Let’s make sure we understand the different symbols for each of the findings:
- Red exclamation marks for open / non-compliant findings

- Green check marks for compliant findings

- Black crossed circles for findings not applicable

- Gray circles for findings not reviewed

Now we can drill down into a specific finding. We will select the first once which will populate the center pane of the application.
This provides us very helpful information such as:
- STIG ID
- Severity
- Rule Title
- Discussion
- Check Steps
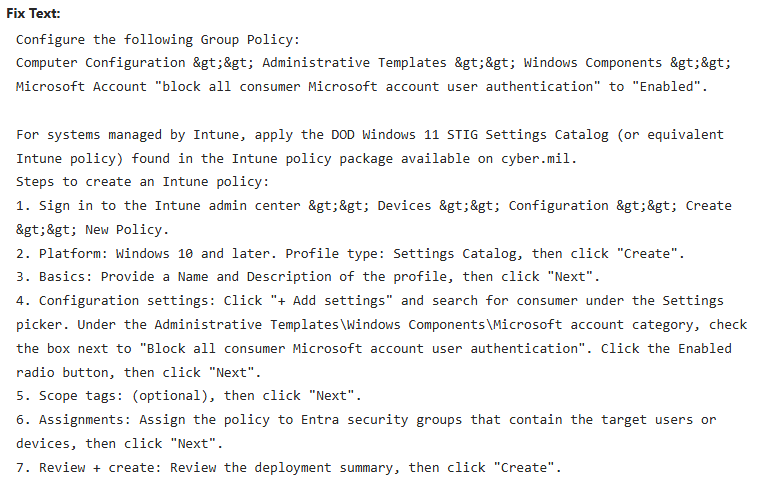
Depending on the information for a given finding, you’ll need to scroll down slightly an it’ll give you the steps needed to remediate a finding:
Now that we know how to find the information about a given finding, the next step is where administrators can begin documenting exceptions and operational justifications. For example, I made a call out earlier about a finding related to DoD NTP, which chances are, will not be relevant to you.
To locate this finding, click on the filter button on the top left side of the application, then enter the text “NTP” and click “Apply”.
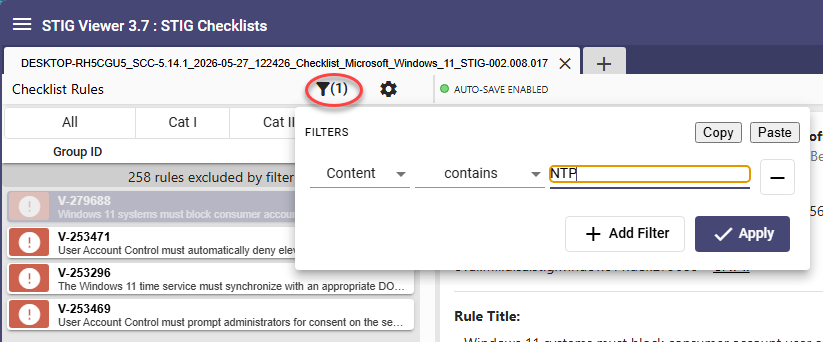
From here, you’ll find that we reduced our number of displayed rules considerably. The one we are looking for here has a “Group ID” of “V-253296”.
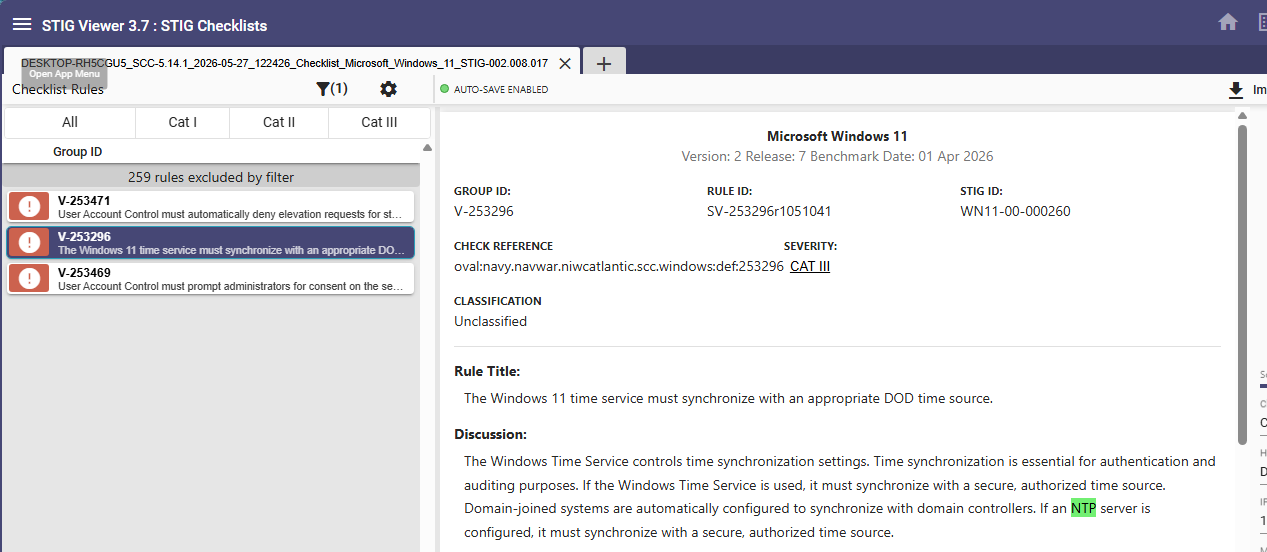
Looking at this rule, we can see that it has a severity level of CAT III. However, it’s still not relevant to us. Through STIG Viewer, comments can be added documenting the rationale and any action we may take on a given finding.
The first thing we are going to do is add a comment as such.

Although we added a comment, the finding still goes against our overall compliance score. Through the STIG Viewer tool, we can change the finding. There are four different statuses that we can change this to which are updated through quick keyboard shortcuts by selecting the rule and pressing the appropriate number of your keyboard.
- Not a finding

- Open / Non-Compliant

- Not applicable

- Not reviewed

In this particular use case, it’s appropriate to denote this finding as “Not Applicable” if you do not intend to change the setting to meet the expected value of the STIG rule.
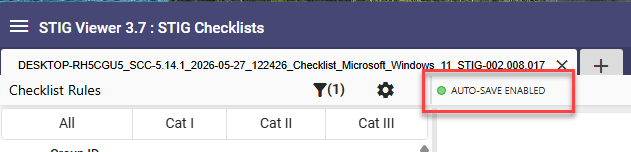
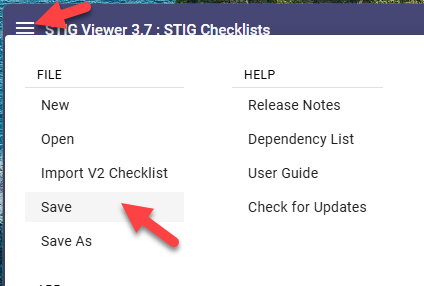
You may notice that STIG Viewer does include auto-save functionality, which can be seen on the top of the application.
While this is useful, do yourself a favor and build the habit of manually saving work regularly using the hamburger menu in the upper left corner of the application and selecting save.
That was a lot of information to unpack, but you should now have a solid understanding of what STIGs are, how organizations use them, and how the overall compliance workflow functions.
We covered everything from selecting baselines and scanning systems to reviewing findings, documenting exceptions, and validating remediation efforts. Most importantly, you should understand that STIG compliance is not about blindly applying settings. Effective hardening requires balancing security, operational needs, and long term maintainability.

Tristram
Tristram is one of our OffSec Community Advisors and a Discord Moderator. He has contributed to the SOC-200 course, a number of other topics for the Learn Platform and Proving Grounds. He primarily focuses on protecting the Healthcare industry as a blue teamer by developing, implementing and monitoring various security solutions.